

Airveek field guide
Wall art print product photo prompt: copy this Airveek workflow
Use the supplied wall-print reference as the identity anchor and the supplied `morrow` logo as the second input. Run one block each for a clean listing, a room-scale lifestyle frame, and a paper-edge detail. Lock the artwork, muted green palette, vertical proportions, visible paper, and exact wordmark; vary only scene, light, crop, and the buyer question each image must answer.
Search task: wall art print product photo prompt
Written by LIKA
The buyer question
What tested Airveek prompt can I use to create a consistent wall art print product-photo set?
Your starting product
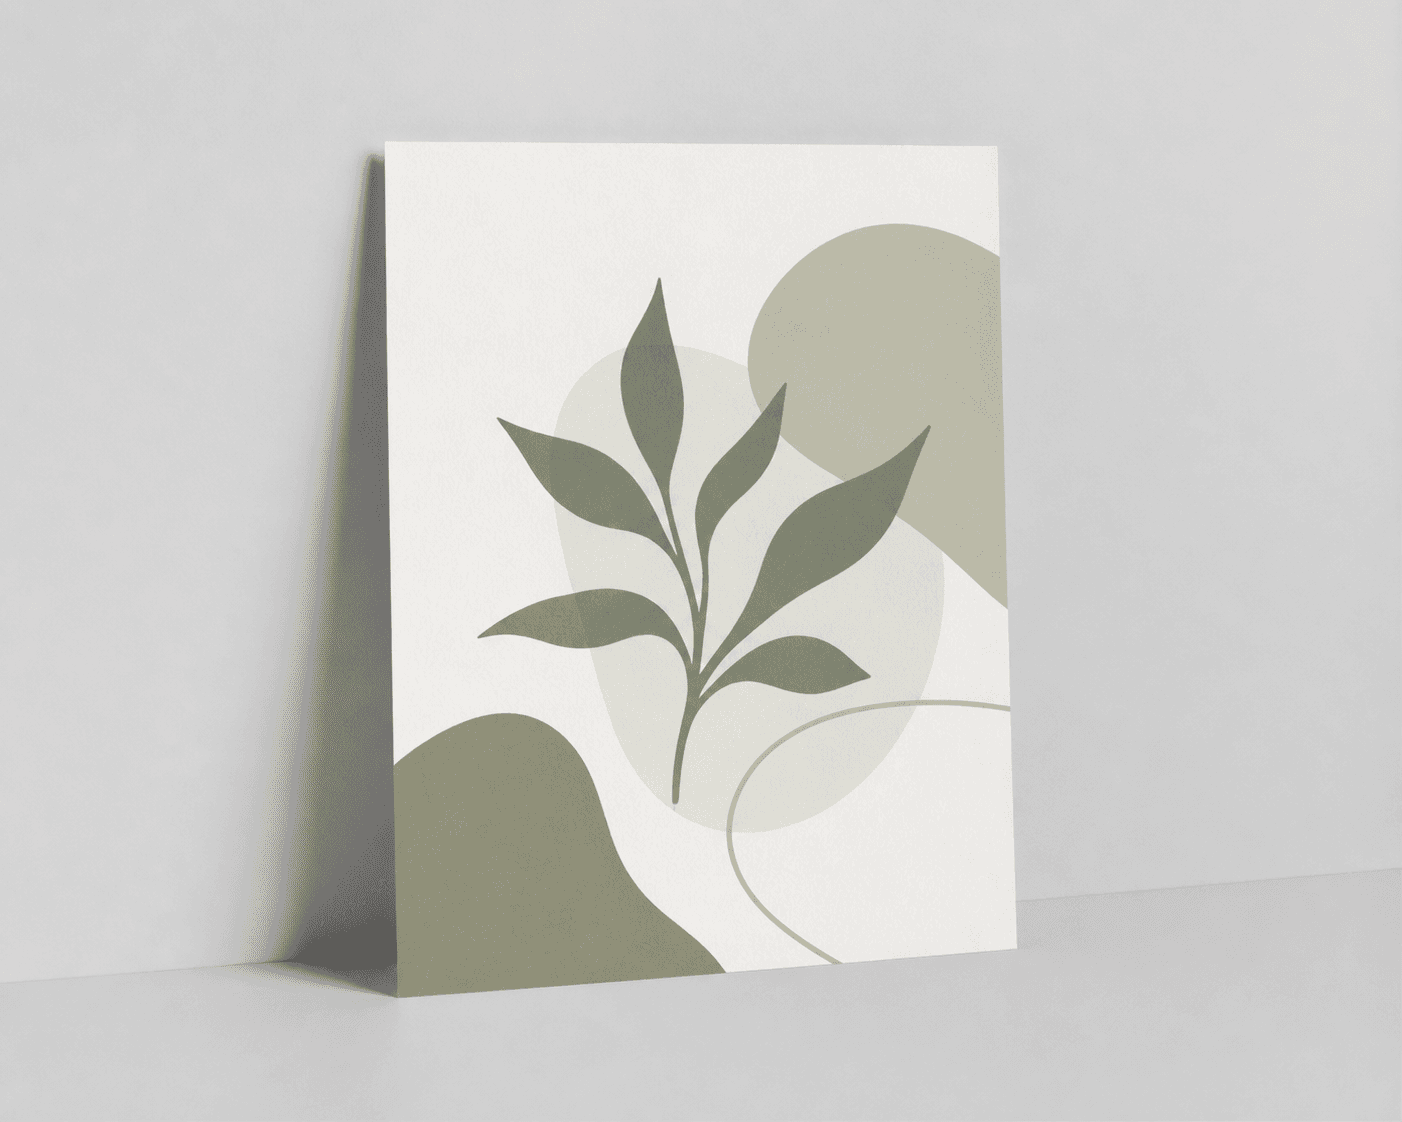
Start with a clear photo that shows the full product and the details shoppers need to see. Keep this reference nearby while you generate, compare, and refine each image.
Quick setup
- Goal
- Ecommerce product-page gallery and mobile-safe prompt set
- Output
- 1:1 square-safe listing and detail working crop, 4:5 portrait lifestyle crop check, 240x240 mobile-thumbnail review, Largest useful master before destination-specific resizing
- cropChecks
- 1:1 square-safe working crop,4:5 portrait check for the lifestyle block,240x240 mobile-thumbnail check
- creatorRoute
- /create/product-fashion
- detailStartingControls
- [object Object]
- listingStartingControls
- [object Object]
- lifestyleStartingControls
- [object Object]
Example Airveek result

How to create it
1. Add the two supplied references
Upload the supplied wall-print image first and the supplied morrow logo image second. Use the print to anchor the vertical abstract artwork, muted green forms, light paper face, proportions, and visible side edge. Keep the lowercase morrow wordmark and both sparkle stars together when the demo mark is shown.
2. Choose one image job
Open Airveek's product-fashion creator and choose studio plus store-listing for the clean listing or paper-edge detail, or lifestyle plus social-post for room context and apparent scale. Run each block as its own generation so every image has one clear buyer question.
3. Lock the print identity
Keep the artwork, muted green palette, vertical proportions, light paper appearance, unframed construction, and visible edge aligned with the supplied reference. Change the scene, light, and crop for the job; do not change the product.
4. Paste the matching prompt block
Use the listing block when the complete print must read immediately, the lifestyle block when a quiet wall-and-console scene should provide a scale cue, and the detail block when the paper surface and side edge need inspection. Keep the supplied logo reference with the set when the mark is shown.
5. Review the result at two scales
Compare the fresh result with the supplied reference at full size, in its destination crop, and at 240 x 240. Check that the artwork and proportions remain recognizable, the paper edge is visible in the detail job, the lifestyle print stays dominant, and the exact morrow mark has not changed.
6. Export by destination
Keep the largest useful master until the destination's current file and image requirements are confirmed. Use the recorded 1024 x 1024 detail result as a workflow example, not as a universal export rule, and keep clean, room-scale, and detail outputs labeled separately.
Tested prompt
Use the supplied unframed wall-print reference as the first input and the supplied fictional morrow logo reference as the second input. When branding is shown, apply the exact lowercase wordmark "morrow" with its two sparkle stars naturally on the product surface; preserve that mark and add no other readable brand text. Keep the same supplied print identity across all three blocks.

LISTING PROMPT
Create one clean marketplace-safe listing photo for one unframed decorative wall print. Keep the exact vertical artwork, muted green colors, light paper appearance, proportions, and visible product edge unchanged. Use a neutral commercial studio background, make the complete print the clear hero, keep the face and edge sharp, and leave enough margin for a centered 1:1 crop and mobile thumbnail. Do not add a frame, mat, hanging hardware, second print, invented dimensions, paper specifications, claims, other readable text, watermarks, retailer logos, or promotional overlays.

LIFESTYLE PROMPT
Create one premium ecommerce lifestyle photo for the same unframed decorative wall print. Keep the exact artwork, colors, paper appearance, proportions, and visible edge unchanged. Place one complete print leaning upright against a calm light wall on a low console or shelf, with one plain unmarked book stack at the far edge as a restrained scale cue. Use soft side light with gentle fill, keep the print dominant and unobscured, and leave room for a 4:5 portrait crop, centered 1:1 crop, and mobile thumbnail. Do not add a frame, mat, hanging hardware, second print, invented dimensions, claims, other readable text, watermarks, retailer logos, or promotional overlays.

DETAIL PROMPT
Create one close-up ecommerce detail photo for one unframed decorative wall print. Keep the exact artwork, colors, paper appearance, and proportions unchanged. Show the category-specific buyer detail clearly: the visible paper surface and one side edge. Use controlled commercial light and a shallow side angle so the edge reads without turning the print into a different object. Keep the complete artwork identifiable and preserve the exact product geometry and supplied mark. Do not invent paper stock, finish, dimensions, mounting hardware, features, claims, other readable text, extra products, watermarks, retailer logos, or promotional overlays.Recorded settings
- cropChecks
- 1:1 square-safe working crop,4:5 portrait check for the lifestyle block,240x240 mobile-thumbnail check
- creatorRoute
- /create/product-fashion
- detailStartingControls
- [object Object]
- listingStartingControls
- [object Object]
- lifestyleStartingControls
- [object Object]
Common problems and fixes
Problem:
Fix: Move the print closer, simplify the wall and console, reduce the scale cue, and recheck the centered 1:1 and 240 x 240 views. Keep the lifestyle block for context and use the listing block for the smallest product thumbnail.
Problem:
Fix: Use a shallow side angle and soft side light with gentle fill. Keep enough of the full artwork in frame to identify the print, and do not replace the edge with an invented frame or mount.
Problem:
Fix: Re-upload the same print and logo references, repeat the identity-locking lines, remove extra styling, and compare the result with the supplied references before selecting it.
What to double-check
- The supplied image visibly supports guidance about one unframed vertical print, its abstract muted green artwork, proportions, light paper face, and visible side edge. Verify exact dimensions, stock, finish, mounting method, and other specifications from the actual product information.
- A generated image can show visible appearance, apparent room scale, and an edge; it cannot establish paper weight, exact color fidelity on every display, archival properties, or physical construction beyond what is visible.
- The reviewed ECO18 capture is a detail job. No listing or lifestyle result is represented in this draft, so run those companion blocks separately before using them as gallery images.
- The recorded detail example is 1024 x 1024. Treat that as the documented workflow output, not a universal marketplace requirement; confirm the current destination specification and do not upscale a thumbnail.
Why this works
The prompt locks one visible print identity and gives each frame one job. Clean studio instructions make the product easy to identify, a restrained wall-and-console scene helps a shopper imagine apparent room scale, and the detail block makes the paper surface and side edge inspectable. Reusing the same source and exact supplied mark creates continuity, while separate crops stop the lifestyle scene from weakening the listing or the detail view.
Before you export
- Use the same supplied wall-print reference and supplied morrow logo reference in every job.
- Keep the vertical artwork, muted green palette, light paper appearance, proportions, unframed construction, and visible edge consistent.
- Give each block one job: clean product identification, room context and apparent scale, or paper-and-edge inspection.
- Use soft controlled light and a shallow side angle for the detail block so the edge reads without glare or a color shift.
- Keep the exact lowercase morrow wordmark and both sparkle stars unchanged, with no other readable brand text.
- Review full size, destination crop, and 240 x 240 mobile-thumbnail scale before selecting or exporting a result.
- Verify dimensions, paper stock, finish, mounting, color, and print quality from product information rather than from the image.
Common questions
Why use separate listing, lifestyle, and detail blocks for one wall art print?
They answer different buyer questions. The listing block makes the complete print easy to identify, the lifestyle block gives a quiet room context and apparent scale cue, and the detail block enlarges the paper surface and one edge. Running them separately keeps props, crops, and lighting from competing with the product's identity.
How do I keep the same artwork consistent across the prompt set?
Upload the same wall-print reference for every job, name the visible artwork, palette, proportions, paper appearance, and edge, and tell Airveek to change only the scene, light, and crop. Compare each result with the reference before selecting it. The supplied morrow logo is a second input when the exact lowercase wordmark and two sparkle stars are shown.
Can this prompt prove the print's exact size, paper stock, or color fidelity?
No. The images can show visible artwork, apparent scale, paper appearance, and an edge, but exact dimensions, stock, finish, archival properties, and color fidelity across screens should come from verified product information. Keep the image prompt specific about what is visible and the product information specific about what is measured or promised.
What should I do if the paper detail disappears in a small crop?
Simplify the scene, bring the print closer, use a shallow side angle, and add soft side light with gentle fill. Recheck the detail frame at full size and 240 x 240. If the edge still cannot read without shrinking the artwork, keep the detail image as a supporting close view and use the clean listing frame for fast identification.
Should an unframed wall print be shown inside a frame in the lifestyle block?
Not for this product example. Keep one complete print leaning against a light wall so the shopper sees the same unframed construction and proportions as the reference. A frame or mat changes the presentation and can hide the paper edge that the detail block is meant to inspect.
Further reading
- Additional image link [additional_image_link] - Google Merchant Center Help — Google Merchant Center Help
- Image link [image_link] - Google Merchant Center Help — Google Merchant Center Help
- [Printing] Suggestions for prints of textured art? — Reddit r/artbusiness discussion
- Airveek image-generation workspace — Airveek
- Image SEO Best Practices — Google Search Central
- The Complete Guide to Ecommerce Photography — Shopify
- Marketplace/category reference — Amazon marketplace reference