

Airveek field guide
Wireless Earbuds Product Photography Guide: Plan a Complete Set
Start with one accurate source asset, then plan three complementary wireless-earbuds images: a clean case-and-earbuds listing frame, a restrained wearing scene for apparent scale, and a close case/detail frame for inspection. In Airveek, keep the product-scene workflow consistent, change the composition and light for each job, preserve the exact two-earbud set and supplied morrow mark, and test every square crop at mobile size before export.
Search task: wireless earbuds product photography guide
Written by LIKA
The buyer question
How do I plan a complete product-photo set for this wireless earbuds from one accurate source asset?
Your starting product
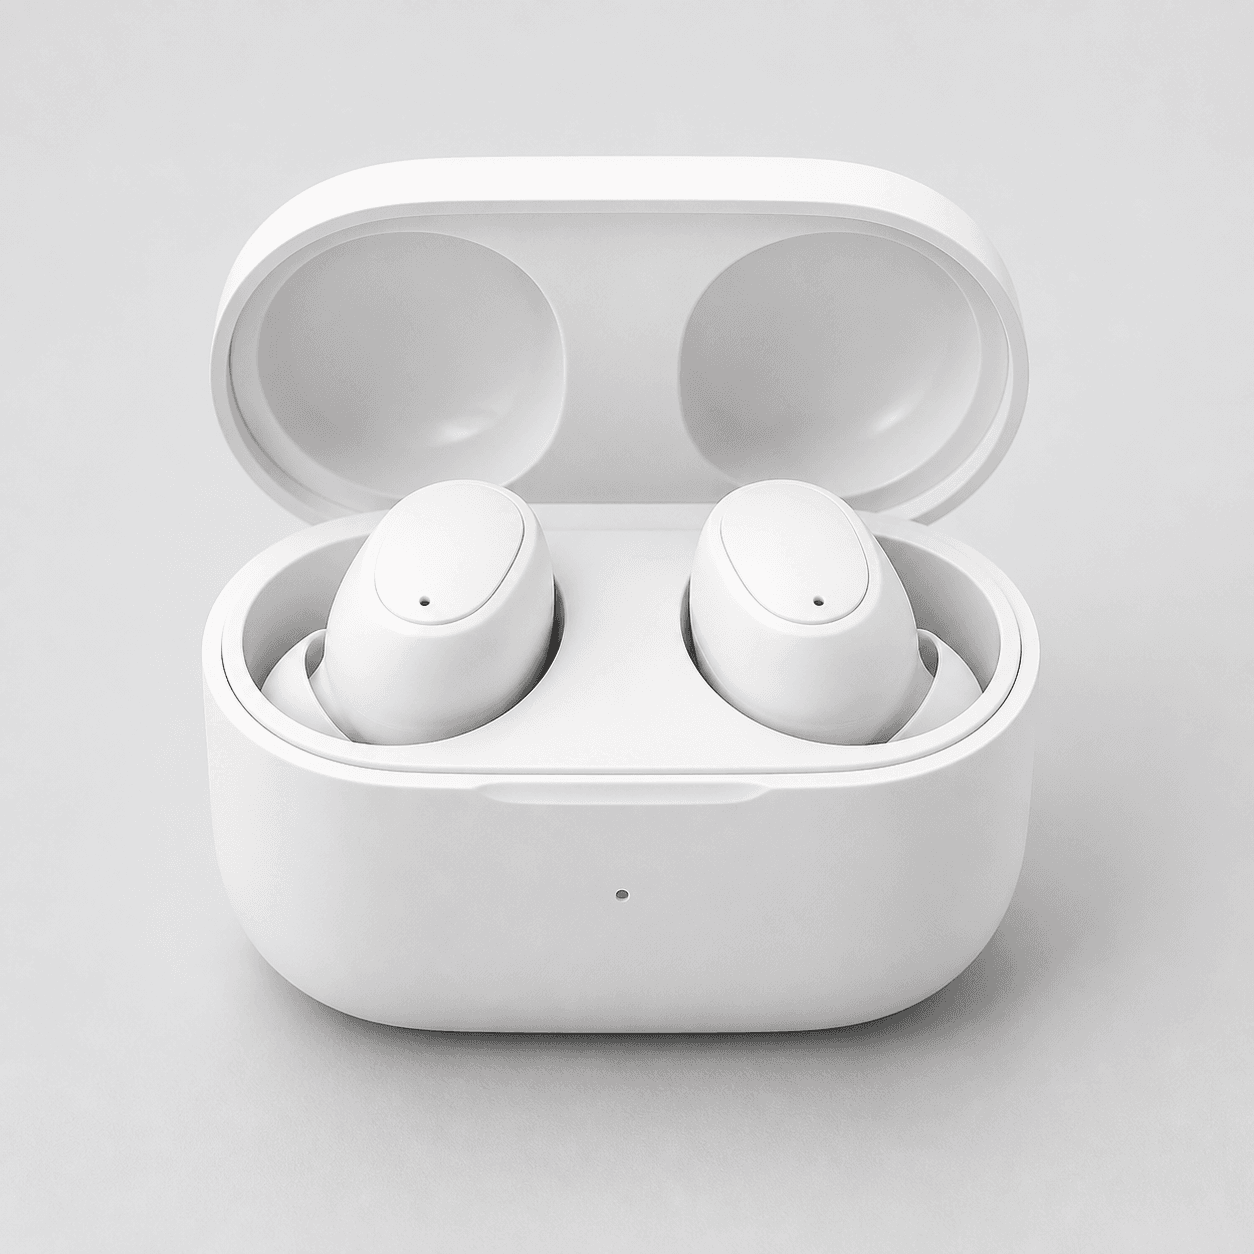
Start with a clear photo that shows the full product and the details shoppers need to see. Keep this reference nearby while you generate, compare, and refine each image.
Quick setup
- Goal
- ecommerce product-page gallery with supporting marketplace and social crops
- Output
- 1024x1024
- Goal
- store-listing
- Mode
- product-scene
- Scene
- studio
- Variations
- 3
Example Airveek result
How to create it
1. Start with the accurate source
Upload the supplied open-case image as the product reference. Use its open white case, two matching earbuds, front indicator, and visible silhouette as the identity checklist for every frame. Add the supplied morrow logo reference for the fictional branded version, preserving the exact lowercase wordmark and both sparkle stars.
2. Give each image one buyer job
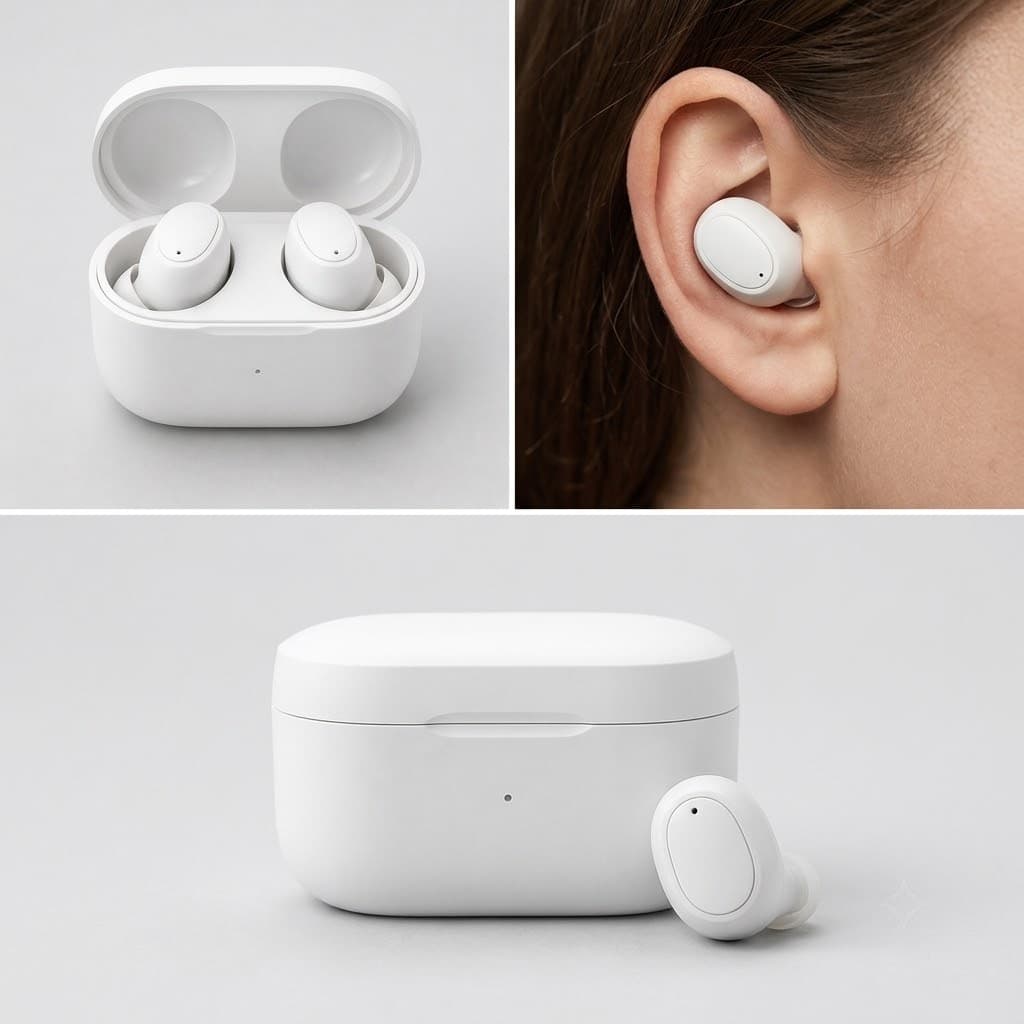
Plan the set before generating: use a clean case-and-earbuds frame for quick identification, a restrained in-ear or charging-station frame for apparent scale, and a close case/detail frame for inspection. The hub coordinates these jobs; the listing, lifestyle, detail, and prompt siblings each go deeper on one job.
3. Set the Airveek base workflow
In Airveek’s product-scene creator, use the recorded base settings Mode: product-scene, Scene: studio, Goal: store-listing, and three variations. Keep the product identity constant while changing the job-specific composition, background restraint, crop, and light direction in the prompt.
4. Build the clean listing frame
Place the open case and both earbuds large in a centered square composition on a light neutral surface that is distinct enough from the white product to preserve its edges. Use soft commercial light with a gentle side or top highlight, keep the case and included parts unobscured, and leave only enough margin for the destination crop.
5. Add scale with a quiet lifestyle cue
Use one restrained wearing or charging-station cue for the lifestyle frame. Keep the product dominant and easy to crop on mobile; let the context explain apparent scale without turning the frame into a tiny product or claiming comfort, universal fit, or a feature the source does not show.
6. Reserve close attention for the case and detail
Move closer for the case rim, lid, earbud face, front indicator, and any control area actually supported by the source or product information. Use controlled directional light to separate white surfaces. If a control is not documented, describe the visible surface rather than inventing a control, label, port, or feature.
7. Review the set at full size and thumbnail size
Compare each result with the source at full size and at 240×240. Check the case silhouette, two-earbud count, white appearance, included parts, visible details, logo placement, and crop safety. Keep the largest clean original as the master; the existing Airveek example is 1024×1024, so follow the destination’s current specification for any larger export.
Tested prompt
Use the supplied fictional morrow logo reference as the only brand reference. Preserve the exact lowercase wordmark "morrow" and both sparkle stars, placing the mark naturally once on the charging case or package; do not invent other readable words. Create a coordinated three-image product-photo set for the supplied small wireless earbuds with charging case: (1) a clean product-dominant listing frame with the open case and both earbuds, (2) a restrained in-ear or charging-station lifestyle frame that gives apparent scale without hiding the product, and (3) a close case/detail frame for the case edge, earbud face, and any control area visible in the source or product information. Keep the exact case shape, two-earbud count, included parts, white appearance, materials, and visible details unchanged. Use controlled commercial light, soft neutral backgrounds, restrained props, square crop-safe framing, and sharp detail. Do not add duplicate earbuds, unshown accessories, unsupported features, dimensions, claims, watermarks, retailer marks, promotional overlays, or other readable text.Recorded settings
- Goal
- store-listing
- Mode
- product-scene
- Scene
- studio
- Variations
- 3
Common problems and fixes
Problem: A detail result adds a third loose earbud or another unshown product part.
Fix: State the exact two-earbud set and included parts in the prompt, keep the source beside the result, and compare the output at full size and 240×240 before selecting it.
Problem: The white case and earbuds disappear into the background at thumbnail size.
Fix: Use a slightly darker light-neutral surface, add a soft directional edge highlight, move the case closer, simplify the scene, and recheck the square crop.
Problem: The lifestyle frame tries to prove the case, wearing fit, and close controls at once.
Fix: Keep one clear scale cue in the lifestyle image, then use separate listing and detail frames for product identification and close inspection.
Problem: The supplied brand mark becomes unreadable or turns into extra copy.
Fix: Use the supplied logo reference exactly, preserve the lowercase morrow wordmark and both sparkle stars, place it once on the product or package, and remove any other readable words.
What to double-check
- The supplied reference visibly shows an open white case with two matching earbuds and a front indicator. Verify fit, controls, battery, charging behavior, connectivity, compatibility, dimensions, and other specifications from the actual product information for the item shown.
- The available Airveek example is one three-panel composition, not three independent final exports. Use it to plan the shot sequence, then create separate listing, lifestyle, and detail frames when the destination needs separate gallery images.
- A wearing cue can show context and apparent scale, but it cannot prove comfort or universal fit for every ear.
- The available composition example predates the supplied morrow logo reference. Use the exact logo reference in the branded prompt and create a fresh branded set before treating logo placement as a final output.
Why this works
Small earbuds need a sequence of clear answers rather than one overloaded frame. The listing view identifies the open case and two earbuds, the lifestyle view adds apparent scale, and the close view reserves attention for visible case or control detail. Keeping the source, light logic, brand reference, and square crop consistent makes the three jobs feel like one set while preserving their different purposes.
Before you export
- Compare every output with the source: same case silhouette, two-earbud count, white appearance, included parts, materials, and visible details.
- Keep the listing frame product-dominant and close enough that the open case and both earbuds still read in a small square thumbnail.
- Give the lifestyle frame one restrained scale cue and keep the case, earbuds, and any visible detail unobscured.
- Use the detail frame for the case and control area only when that detail is visible in the source or confirmed by product information; reject invented features.
- When using the supplied branded version, preserve the exact lowercase morrow wordmark and both sparkle stars, with no other readable brand copy.
- Check the square set at 240×240, keep the largest original as the master, and export a destination-specific crop without enlarging a thumbnail.
Common questions
What belongs in a complete wireless-earbuds product photo set?
Plan three complementary jobs: a clean case-and-earbuds frame for identification, a restrained wearing or everyday-use frame for apparent scale, and a close case/detail frame for inspection. Each image should answer a different buyer question instead of repeating the same crop.
Should the charging case and wearing view be in the same image?
Only when both remain large and easy to inspect. For small earbuds, a separate wearing image gives the scale cue room while the listing frame keeps the case and both earbuds clear. Use the close frame for inspection rather than turning the lifestyle view into a crowded collage.
Can a product photo prove fit, controls, battery life, or compatibility?
A photo can show visible shape, wearing context, and a control area that is actually documented or visible. It cannot establish comfort, universal fit, battery life, charging behavior, connectivity, or compatibility. Verify those specifications from the product information for the exact item shown.
How should I size and export the images?
Keep the largest clean original as the master, avoid enlarging a thumbnail, and test the square crop at 240×240 before export. The documented Airveek composition example is 1024×1024; for a shopping feed or another destination, check its current image specification and export the largest version your source supports.
Further reading
- Phone Product Photography: How to Take Product Photos — Shopify
- Airveek: All-in-One AI Image Generator — Airveek
- Image SEO Best Practices — Google Search Central
- Photography Workflow: How to Plan, Shoot, and Edit — Shopify
- What Is Lifestyle Photography? Steps, Examples, and Tips — Shopify
- Additional image link [additional_image_link] - Google Merchant Center Help — Google Merchant Center Help
- Local product data specification - Google Merchant Center Help — Google Merchant Center Help
- Marketplace/category reference — Amazon marketplace reference
- Image link [image_link] - Google Merchant Center Help — Google Merchant Center Help
- The Complete Guide to Ecommerce Photography — Shopify